buka project yang sudah terkoneksi ke firebase.
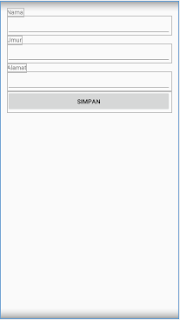
kemudian design tampilan aplikasi seperti ini :
codingannya :
<?xml version="1.0" encoding="utf-8"?>
<LinearLayout xmlns:android="http://schemas.android.com/apk/res/android"
xmlns:app="http://schemas.android.com/apk/res-auto"
xmlns:tools="http://schemas.android.com/tools"
android:layout_width="match_parent"
android:layout_height="match_parent"
android:orientation="vertical"
android:padding="16dp"
tools:context=".MainActivity">
<TextView
android:layout_width="wrap_content"
android:layout_height="wrap_content"
android:text="Nama" />
<EditText
android:id="@+id/txtNama"
android:layout_width="match_parent"
android:layout_height="wrap_content" />
<TextView
android:layout_width="wrap_content"
android:layout_height="wrap_content"
android:text="Umur" />
<EditText
android:id="@+id/txtUmur"
android:layout_width="match_parent"
android:layout_height="wrap_content" />
<TextView
android:layout_width="wrap_content"
android:layout_height="wrap_content"
android:text="Alamat" />
<EditText
android:id="@+id/txtAlamat"
android:layout_width="match_parent"
android:layout_height="wrap_content" />
<Button
android:text="Simpan"
android:id="@+id/btnSimpan"
android:layout_width="match_parent"
android:layout_height="wrap_content" />
</LinearLayout>
selanjutnya kita akan menginisialisasi view pada mainActivity. buka file MainActivity di project kamu, dan buat Inisialisai variabel seperti ini :
public class MainActivity extends AppCompatActivity {
EditText edtNama, edtUmur, edtAlamat;
Button btnSimpan;
@Override
protected void onCreate(Bundle savedInstanceState) {
super.onCreate(savedInstanceState);
setContentView(R.layout.activity_main);
edtNama = findViewById(R.id.txtNama);
edtUmur = findViewById(R.id.txtUmur);
edtAlamat = findViewById(R.id.txtAlamat);
btnSimpan = findViewById(R.id.btnSimpan);
}
}
langkah berikutnya, deklarasikan DatabaseReference untuk bisa mengisi data ke firebase
DatabaseReference database;
dan didalam method OnCreate, tambahkan baris coding berikut :
database = FirebaseDatabase.getInstance().getReference();
buat sebuah model untuk pengiriman data ke firebase. tambahkan sebuah kelas baru dan beri nama Request.java
buat getter setter dan Constructur untuk variable-variable yang digunakan.
public class Request {

    private String nama, alamat;
    private int umur;
    private String key;

    public Request() {

    }

    public Request(String nama,String alamat, int umur) {
        this.nama = nama;
        this.alamat = alamat;
        this.umur = umur;

    }

    public String getNama() {
        return nama;
    }

    public void setNama(String nama) {
        this.nama = nama;
    }

    public String getAlamat() {
        return alamat;
    }

    public void setAlamat(String alamat) {
        this.alamat = alamat;
    }

    public int getUmur(){
        return umur;
    }

    public void setUmur(int umur) {
        this.umur = umur;
    }

    public String getKey() {
        return key;
    }

    public void setKey(String key) {
        this.key = key;
    }
}
buka kembali file MainActivity.java. sekarang kita akan membuat code untuk proses simpan datanya.
buat sebuah method berinama submitUser, dan tambahkan code berikut ini ;
private void submitUser(Request request) {
    database.child("Request")
            .push()
            .setValue(request)
            .addOnSuccessListener(this, new OnSuccessListener<Void>() {
                @Override
                public void onSuccess(Void aVoid) {
                    edtNama.setText("");
                    edtUmur.setText("");
                    edtAlamat.setText("");
                    Toast.makeText(getApplicationContext(), "Data berhasil disimpan", Toast.LENGTH_SHORT).show();
                }
            });
}
langkah terakhir adalah memanggil method submitUser saat tombol simpan di klik. caranya adalah sebagai berikut :
btnSimpan.setOnClickListener(new Button.OnClickListener() {
    @Override
    public void onClick(View view) {
        String nama = edtNama.getText().toString();
        String alamat = edtAlamat.getText().toString();
        int umur = Integer.parseInt(edtUmur.getText().toString());
        submitUser(new Request(nama.toLowerCase(), alamat.toLowerCase(), umur));
    }
});
okee selesaiiii. silahkan coba dijalankan...
oke guys, sekian dulu tutorial hari ini. jika kamu mengalami kesulitan atau ada yang ragu silahkan komen dibawah.
salam developer


Tidak ada komentar:
Posting Komentar